 |
| Hailstones in our front yard. |
 |
| One of the larger hailstones. |
First, we had to get rid of the existing shed.
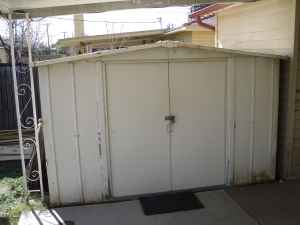 |
| The original shed, the Storage Turd 1000. |
Allie and I did not want to deal with the demolition of the old shed so we sold it on Craigslist. The person who bought it also removed it and hauled it away.
Next step – painting the trim and laundry room of the house. With the money we saved on the new shed (and with what we made on the old shed), we were able to hire house painters for a little bit of a touch up. The fact is some of the paint was peeling, so with the old shed gone, the time was just right to paint (the original shed was placed up against the laundry room wall, so with the shed gone, that wall could be accessed). We hired Richard Dumholf and his crew who did a fantastic job for a very reasonable rate. In the Phoenix Valley, he can be contacted at 602-525-8904.
 |
| The front of our house with the original trim color. |
 |
| A closeup of the original trim (shown with some storm damage). |
 |
| The house with our new trim color. |
 |
| Close up of the new trim color and house numbers. |
The shed we bought is a pretty basic Arrow storage shed measuring 10’ wide by 8’ deep with a maximum height of 7’ at the ridge line. It had a smaller footprint then the original, but at least I could stand up in it (the original only had a height of 6' at the ridge line). The entire box that it came in was about 7’ long by 3’ wide and only 6 inches thick. EVERY part was going to have to be assembled. Tons of panels and what looked like thousands of little screws, bolts and washers of varying shapes and sizes lay inside our cardboard Pandora’s Box. And, just as with the real thing, once it was opened we couldn’t close it back up. As a matter of fact, Allie had looked up “Arrow Shed Construction” on YouTube and she found a video of a man describing his experience. Most notable, he mentioned that he couldn’t PAY anyone to help him, and it took 3 weeks for him to build. Ugh. Allie and I had to take a step back, reaffirm our love for each other, and get to work.
Of course, about an hour in, we asked: "why did we do this to ourselves" and "why, God, why"? Well, we were committed, so no point in whining about it, right?
Step one, the floor kit. This actually wasn’t so bad. After clearing away the old floor (the buyer of the old shed did not want it) and re-grading the ground, we were able to lay down the aluminum floor supports in a fairly short amount of time. Then, weather delay. As we were about to start building the walls, the wind kicked up. The directions for the shed clearly stated not to build in windy conditions. Unfortunately, we had already started putting up the corners for the walls, so we had to disassemble what we had erected above the floor frame (we left the frame in place) and call it a day. We picked up construction bright and early on the following Saturday morning and continued into the waning daylight of Sunday evening.
 | ||
| Floor kit assembly with corner wall posts and bracing (this was after the wind delay). |
We started with the walls, again, followed by laying down the plywood deck for the floor.
 |
| Walls with exposed floor frame. |
 |
| Walls with plywood deck. |
 |
| Close up of deck over frame - I used self tapping screws to bite into the aluminum framing. |
After the deck was down, it was time to finish the walls. By now, Allie and I were pretty tired, and a little overwhelmed by what lay ahead of us – namely the roof. But, we pressed on….
 |
| Completed walls with floor and roof gables. |
The roof was probably the most challenging part of the whole thing, as most of the work had to be done on a ladder while holding large panels and tiny screws. After fighting with the roof for what felt like forever, we were done with the really hard stuff. Lastly, we had to add trim and the front doors. A couple of hours later, and the whole shed was finished.
 |
| Inside ceiling support. |
 |
| Ceiling support toward front door. |
We survived. We didn’t kill each other. There was no ritual suicide involved. We are not divorced. The shed did not beat us. However, at the end of the day, it is just a shed. It is not pretty or fancy, and it is not the first thing we will be showing out guests who visit. After all of the large renovation projects that we have done, this one, though laborious and large, just seemed sort of “eh” when all was said and done. Hence the name, Storage Turd 5000.
Should you decide to attempt to build one of these things, here is some advice:
 |
| The completed Storage Turd 5000. It's not so bad! |
1. Be patient. Seriously, this is going to take some time - Rome was not built in a day, and neither is an Arrow Storage Shed.
2. Have a helper ready to go - you're gonna need them.
3. Be nice to your helper!
4. Keep your instructions near by at all times and re-read them again and again.
5. Keep track of your parts. We separated out all of our pieces by number. This will save you a lot of time and aggravation.
6. We found gloves to be very helpful - the panels are thin and sharp - you could really hurt yourself, so be careful.
7. Think outside the box - the directions are a little vague in some places, as are the diagrams. There also seemed to be some gaps in the instructions. So, think ahead and take nothing for granted. This is only a partial paint-by-numbers project - you will need your brain!
Good Luck!
Good Luck!