Welcome to the Lone Wolf Drafting and Design Blog! Here, you can read about works in progress, completed projects, and view sneak peeks of up and coming designs. There will also be the occasional posts about my life, and what it takes to run a small company specializing in the 3D photorealistic rendering and architectural design field. Please follow me, and feel free to share your experiences in the design world and just running in business in good and bad times. Thanks for reading!
Saturday, February 19, 2011
A Quickie
Hello All - I just wanted to take a moment to thank all of my readers who visit my blog and leave comments - I love to read them. I also wanted to take this opportunity to apologize for not responding back. While I enjoy writing my blog entries, I don't necessarily know all of the "ins-and-outs" of Blogger. However, that has changed today.
I have set my comment notification option to "send notification", so for those of you who do comment, I will respond back to you in a much more timely manner.
I also had to add the "captcha" feature - personally, I hate this thing, but I had hundreds of spam emails, so I figured it was time to enable it. I hope this does not sway people from leaving comments.
Again, just a big thanks to everyone who stops by and reads my posts - it means a lot. I would encourage other readers to say hello, too; and if you have a blog or website (that is not spam), leave a link - I would be happy to check it out!
Thanks again!
Sean DiVincenzo
Lone Wolf Drafting and Design
www.lonewolfdrafting.com
Labels:
Thanks
Monday, February 14, 2011
Home Sweet Home – Part Two
Website Update!!
Before starting the new blog entry, I wanted to inform my readers that my site has been updated! Since the completion of two more garages, I have reorganized the “Real vs. Rendered” page of my site. This will make it much easier to navigate the projects listed in this section and will reduce load time for the overall page.
The Command Center
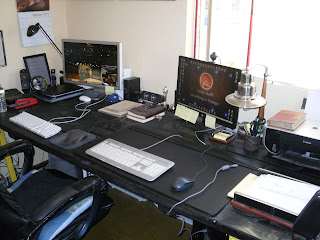
Yes, my office is called the Command Center, so let’s just get that out of the way right now. I do everything from my office; my design work, renderings for clients, internet searches, viewing movies from Hulu and Netflix, listening to music and the Opie and Anthony Show just a name a few activities. When things get busy, I eat and sleep in my office. If the Xbox were in here, I would never leave this space.
This is how it has always been, especially since I went into business for myself. My first office was in my apartment in Mesa – it was a pretty large space, but sparse – I had a computer desk, my drafting desk, a book shelf and a filing cabinet. My office in Surprise was drastically smaller and far more cramped and not nearly as fun to be in do to its very compact size. That space was actually cavernous compared to the next place – the apartment in the Executive Tower. My office was a small section of the living room – it was literally just a desk and chair in a 5 foot by 5 foot (25 sq.ft.) of space. It was a tight year.
 |
| The apartment at the Executive Tower - my desk is behind the couch. |
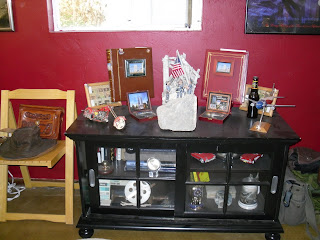
So, when Allie and I bought our first home together (see the story of the renovation here and here), I decided I was going to put together my perfect office. It is still a work in progress, but I would say I am 95% there (we will get to that later). The first order of business was color selection. All of my past home offices were always white – boring. I decided to go bold in this one – Venetian Stucco for 3 walls and a punch of bold Red Delicious for my accent wall. The only things I left original to the room were the wood baseboards and hand plastered ceiling.
 |
| Venetian Stucco |
 |
| Red Delicious |
In past offices, I had an L-shaped desk and my drafting table (it is an amazing full sized iron and wood mechanical drafting desk from 1955 – it now resides in my wife’s office). These two items took up most of the space, and left room for little else. It was decided early on that I would part with my drafting desk provided I could find a regular desk that would fit my needs and my small budget. The frosted glass L-shaped desk was sold off when we moved from our house in Surprise as there was no room for it in apartment. So, I would need to purchase 2 desks for this idea to work, and reverse the second one.
Okay, not a bad solution, but not my favorite, and certainly not worthy of the departure of my beautiful drafting desk. Add to that the price tag of $200.00 for two new desks, and this idea quickly lost merit. One day, Allie and I went out to IKEA to look for storage solutions and desks. Allie spotted a desk that had a storage unit on one side and a sawhorse support on the other – I was very intrigued. In a combined flash of brilliance, Allie and I headed over to Home Depot to look into the possibility of building my own unique desk.
I was definitely on board with the sawhorse leg idea. Home Depot had the Task Force metal sawhorse for sale for about $30.00 ($60.00 for 2). The nice thing about these, other then their steel construction, is that you can adjust the height – perfect for setting the height of a desk.
I then went over to the lumber department to pick out 5 6”x2”x10’ long boards that would make the desk top as well as ebony colored stain. By the time all was said and done, I had built the deck of an aircraft carrier – fantastic. I have plenty of room for my computers, printer, scanner and other assorted equipment and peripherals. I love this thing. The total cost came out to about $110.00 total – the cheapest solution in the desk hunt.
Once the desk conundrum was solved, the rest of the office just sort of fell into place. I put in a nice display case for various memorabilia, my antique 1955 Zenith stereo, file cabinets and another storage unit. I also added small rug circles just for fun.
The only thing left on the list are the window dressings, which will be heavy roman shades that my wife is making for me and swapping out the ceiling fan for something a bit more “me”.
 |
| Original wood doors and trim. |
 |
| Original hand plaster swirl pattern. |
 |
| Ceiling fan that I want to either renovate or replace. |
Still to come: painting the house and cabinet renovation.
Labels:
Renovation
Subscribe to:
Comments (Atom)


