Showing posts with label Renovation. Show all posts

Friday, May 20, 2011

It’s A Spray Paint Party!

When my wife and I went to Portland, Oregon, we wanted to bring home something unusual, something to really capture the weirdness and coolness of the city.  We landed on a gumball machine.  It wasn’t old or original or anything, but it was interesting.  The actual base of the gumball machines are made of plastic, the gumball tanks are clear plastic and they sit on a wooden platform supported by a balustrade. 

Perfect.

Unfortunately, I don’t have a before photo, but here is the gist of it: 

There are two plastic bases – one was black, the other green.  The balustrade post was purple and chipped.  All of the internal mechanical parts were ripped out and just sitting in the clear plastic gumball tanks.

Here is a photo of the gumball machine during prepping for restoration:
The base of the gumball machine.
The tanks and bases have been removed, so all that is showing here is the purple balustrade and tank base plates before sanding (which was done by my wife, Allie).

After Allie sanded the support base, I went to work on painting and putting it all back together.  For the restoration of this and the next project discussed in this post, I used spray paint only, as did Allie on her projects, which you can read about here

The colors that I used are Rustoleum’s Regal Red and Canvas White for both jobs.
Regal Red.
Canvas White.
I painted the purple base white and the green and black gumball bases red.  I left the hardware the original metallic color (we had considered painting them silver, but decided we liked the original brass instead).

The finished project.
I used Devcon’s High Strength 5 Minute Epoxy Gel to put all the major components back together.
The epoxy - this stuff is awesome!
Most of the internal components were set aside (possibly for a future art project) simply because this gumball machine is no longer operational.  As a matter of fact, Allie and I were thinking about filling the tanks with marbles or dice (we would be open to other suggestions – feel free to leave them in the comments section).  I did however fix the exterior hardware – the trap door and turnkeys.  Sadly, one turnkey is missing, so I am on the hunt to find a replacement.
The missing turnkey is on the left - anyone know where I can get one?


After that project was completed, I turned my attention to two filing cabinets that I bought at Goodwill.  Originally, my thought was to replace my old, mismatched filing cabinets for a tall 4 or 5 drawer unit.  After unsuccessfully looking for a tall cabinet for a reasonable price, I decided to get two almost identical cabinets – they were both the same height, but one was wider then the other.  I figured they would look okay stacked up, which is how they were at the Goodwill store.

Of course, I don’t have a before photo, but I do have a pre-prep image:
The grey outer shell of the cabinet.
Just imagine another 2 drawer set in metallic grey, and that’s what they looked like.  I decided that I wanted to add some pop to these cabinets, so I painted them. I used the same white and red spray paint combo from the gum ball machine.  Those colors actually went very well with the wall colors in my office, which consists of Venetian Stucco (an off white) and Red Delicious (a deep red).

As I mentioned before, I was going to stack them, but after doing so, they just seemed too big and bulky and awkwardly placed in the corner.  So Allie suggested that I make the cabinets the supports for my desk.  Originally, I was a little hesitant – my desk was supported by two industrial sawhorses; what I thought was a unique solution (also thought of by my wife).   

The desk with sawhorse support.  Note the old, mismatched filing cabinets in the corner.
I would like to take a moment to point out the paper shades in the windows - those are no longer hanging in my office.  Allie, my wonderful and talented wife, made me, that's right, made me, my own custom Roman shades.  You can read about that project here.

However, the case to change out the horses for the cabinets was a strong one – I could have more readily accessible file storage and stronger (wider) supports for the desk.  I was also able to better hide all of the seemingly hundreds of cables and plugs out of view and de-clutter the corner of my office.  So, after much wrangling, Allie and I were able to swap out the sawhorses for the file cabinets, and they look great:
The larger (wider) filing cabinet.
The narrow cabinet.
Wide shot of completed cabinets and desktop.
View of cabinet color and wall color
Both projects took the course of a weekend to complete, and all in all, I am very happy with how they came out.  We got them finished just in time to beat out the Arizona heat. 

Thanks for reading!

Monday, March 28, 2011

The Storage Turd 5000

My wife and I have proudly held our heads high when it comes to renovating our home.  We have worked hard on making our floors, walls, bathrooms and kitchen as pretty as we can possibly make them.  We were also very happy with the exterior of our house – it needed some work, but it was still nice and certainly passable.  Then God intervened.  In early October of 2010, the Phoenix Valley was slammed with not one, but two wicked hail storms in the same day and my new neighborhood was right in the middle of it.  After the storm, I, like many of my neighbors filed claims with their respective insurance companies, and work began (and is still going on) all around the community.

Hailstones in our front yard.
One of the larger hailstones.
Our damage bill included the roof, A/C unit, large section of fence, the patio cover and our shed.  TECA Roofing (who I highly recommend) did a fantastic job repairing or replacing everything, except our shed.  Apparently, shed replacement was the one thing that TECA did not do.  But, my wife and I gave it a “whatever”, and concentrated on the big stuff that was being repaired; the shed was damaged, but it was still standing.  As the larger items were nearing completion, Allie and I started shed shopping, along with everyone else in the Valley.  Wonderful.  Just about every place in Phoenix was sold out of sheds, and the few that were remaining were very expensive, so we delayed our purchase for a little while longer.  Finally, we found one well within our price range – things were now in motion.

First, we had to get rid of the existing shed. 
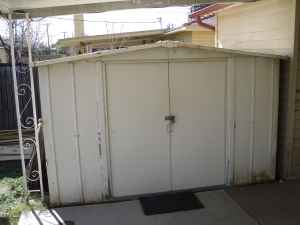
The original shed, the Storage Turd 1000.
Allie and I did not want to deal with the demolition of the old shed so we sold it on Craigslist. The person who bought it also removed it and hauled it away. 

Next step – painting the trim and laundry room of the house.  With the money we saved on the new shed (and with what we made on the old shed), we were able to hire house painters for a little bit of a touch up.  The fact is some of the paint was peeling, so with the old shed gone, the time was just right to paint (the original shed was placed up against the laundry room wall, so with the shed gone, that wall could be accessed).  We hired Richard Dumholf and his crew who did a fantastic job for a very reasonable rate.  In the Phoenix Valley, he can be contacted at 602-525-8904.

The front of our house with the original trim color.
A closeup of the original trim (shown with some storm damage).
The house with our new trim color.
Close up of the new trim color and house numbers.
After two days of painting, the job was completed and the new shed was delivered from Home Depot and it was time to build. 

The shed we bought is a pretty basic Arrow storage shed measuring 10’ wide by 8’ deep with a maximum height of 7’ at the ridge line.  It had a smaller footprint then the original, but at least I could stand up in it (the original only had a height of 6' at the ridge line).  The entire box that it came in was about 7’ long by 3’ wide and only 6 inches thick.  EVERY part was going to have to be assembled.  Tons of panels and what looked like thousands of little screws, bolts and washers of varying shapes and sizes lay inside our cardboard Pandora’s Box.  And, just as with the real thing, once it was opened we couldn’t close it back up.  As a matter of fact, Allie had looked up “Arrow Shed Construction” on YouTube and she found a video of a man describing his experience.  Most notable, he mentioned that he couldn’t PAY anyone to help him, and it took 3 weeks for him to build.  Ugh.  Allie and I had to take a step back, reaffirm our love for each other, and get to work.

Of course, about an hour in, we asked: "why did we do this to ourselves" and "why, God, why"?  Well, we were committed, so no point in whining about it, right?

Step one, the floor kit. This actually wasn’t so bad.  After clearing away the old floor (the buyer of the old shed did not want it) and re-grading the ground, we were able to lay down the aluminum floor supports in a fairly short amount of time.  Then, weather delay.  As we were about to start building the walls, the wind kicked up.  The directions for the shed clearly stated not to build in windy conditions. Unfortunately, we had already started putting up the corners for the walls, so we had to disassemble what we had erected above the floor frame (we left the frame in place) and call it a day.  We picked up construction bright and early on the following Saturday morning and continued into the waning daylight of Sunday evening.

Floor kit assembly with corner wall posts and bracing
(this was after the wind delay).

We started with the walls, again, followed by laying down the plywood deck for the floor.

Walls with exposed floor frame.
Walls with plywood deck.
Close up of deck over frame - I used self tapping screws
to bite into the aluminum framing.
After the deck was down, it was time to finish the walls.  By now, Allie and I were pretty tired, and a little overwhelmed by what lay ahead of us – namely the roof.  But, we pressed on….

Completed walls with floor and roof gables.
The roof was probably the most challenging part of the whole thing, as most of the work had to be done on a ladder while holding large panels and tiny screws.  After fighting with the roof for what felt like forever, we were done with the really hard stuff.  Lastly, we had to add trim and the front doors.  A couple of hours later, and the whole shed was finished.
Inside ceiling support.
Ceiling support toward front door.
We survived.  We didn’t kill each other. There was no ritual suicide involved.  We are not divorced.  The shed did not beat us.   However, at the end of the day, it is just a shed.  It is not pretty or fancy, and it is not the first thing we will be showing out guests who visit.  After all of the large renovation projects that we have done, this one, though laborious and large, just seemed sort of “eh” when all was said and done.  Hence the name, Storage Turd 5000.
The completed Storage Turd 5000. It's not so bad!
Should you decide to attempt to build one of these things, here is some advice:
1. Be patient.  Seriously, this is going to take some time  - Rome was not built in a day, and neither is an  Arrow Storage Shed.
2. Have a helper ready to go - you're gonna need them.
3. Be nice to your helper!
4. Keep your instructions near by at all times and re-read them again and again.
5. Keep track of your parts.  We separated out all of our pieces by number.  This will save you a lot of time and aggravation.
6. We found gloves to be very helpful - the panels are thin and sharp - you could really hurt yourself, so be careful.
7. Think outside the box - the directions are a little vague in some places, as are the diagrams.  There also seemed to be some gaps in the instructions.  So, think ahead and take nothing for granted.  This is only a partial paint-by-numbers project - you will need your brain!

Good Luck!

Monday, February 14, 2011

Home Sweet Home – Part Two

Website Update!!

Before starting the new blog entry, I wanted to inform my readers that my site has been updated! Since the completion of two more garages, I have reorganized the “Real vs. Rendered” page of my site.  This will make it much easier to navigate the projects listed in this section and will reduce load time for the overall page.

The Command Center

Yes, my office is called the Command Center, so let’s just get that out of the way right now.  I do everything from my office; my design work, renderings for clients, internet searches, viewing movies from Hulu and Netflix, listening to music and the Opie and Anthony Show just a name a few activities.  When things get busy, I eat and sleep in my office. If the Xbox were in here, I would never leave this space. 

This is how it has always been, especially since I went into business for myself.  My first office was in my apartment in Mesa – it was a pretty large space, but sparse – I had a computer desk, my drafting desk, a book shelf and a filing cabinet. My office in Surprise was drastically smaller and far more cramped and not nearly as fun to be in do to its very compact size.  That space was actually cavernous compared to the next place – the apartment in the Executive Tower.  My office was a small section of the living room – it was literally just a desk and chair in a 5 foot by 5 foot (25 sq.ft.) of space.  It was a tight year.
The apartment at the Executive Tower -
my desk is behind the couch.
So, when Allie and I bought our first home together (see the story of the renovation here and here), I decided I was going to put together my perfect office.  It is still a work in progress, but I would say I am 95% there (we will get to that later).  The first order of business was color selection. All of my past home offices were always white – boring.  I decided to go bold in this one – Venetian Stucco for 3 walls and a punch of bold Red Delicious for my accent wall.  The only things I left original to the room were the wood baseboards and hand plastered ceiling.

Venetian Stucco
Red Delicious
In past offices, I had an L-shaped desk and my drafting table (it is an amazing full sized iron and wood mechanical drafting desk from 1955 – it now resides in my wife’s office).  These two items took up most of the space, and left room for little else.  It was decided early on that I would part with my drafting desk provided I could find a regular desk that would fit my needs and my small budget.  The frosted glass L-shaped desk was sold off when we moved from our house in Surprise as there was no room for it in apartment.  So, I would need to purchase 2 desks for this idea to work, and reverse the second one.
Okay, not a bad solution, but not my favorite, and certainly not worthy of the departure of my beautiful drafting desk.  Add to that the price tag of $200.00 for two new desks, and this idea quickly lost merit.  One day, Allie and I went out to IKEA to look for storage solutions and desks.  Allie spotted a desk that had a storage unit on one side and a sawhorse support on the other – I was very intrigued.  In a combined flash of brilliance, Allie and I headed over to Home Depot to look into the possibility of building my own unique desk.

I was definitely on board with the sawhorse leg idea.  Home Depot had the Task Force metal sawhorse for sale for about $30.00 ($60.00 for 2).  The nice thing about these, other then their steel construction, is that you can adjust the height – perfect for setting the height of a desk. 

I then went over to the lumber department to pick out 5 6”x2”x10’ long boards that would make the desk top as well as ebony colored stain.  By the time all was said and done, I had built the deck of an aircraft carrier – fantastic.  I have plenty of room for my computers, printer, scanner and other assorted equipment and peripherals.  I love this thing.  The total cost came out to about $110.00 total – the cheapest solution in the desk hunt. 

For more circulation under the desk,
I reused the vent fans from the home renovation
Once the desk conundrum was solved, the rest of the office just sort of fell into place. I put in a nice display case for various memorabilia, my antique 1955 Zenith stereo, file cabinets and another storage unit.  I also added small rug circles just for fun.

Jack, the company mascot.
The only thing left on the list are the window dressings, which will be heavy roman shades that my wife is making for me and swapping out the ceiling fan for something a bit more “me”.

Original wood doors and trim.
Original hand plaster swirl pattern.
Ceiling fan that I want to either renovate or replace.
Still to come: painting the house and cabinet renovation.

Tuesday, February 1, 2011

Home Sweet Home – Part 1

About 7 months ago, my wife and I bought our first home together.  I have posted a photo here and there in various other posts of the front of my house, but I have never really discussed the renovation process that made this house into our home.  This blog will be the beginning of an occasional series that will take you through the stages of the design and process of a moderate renovation to a starter home and will concentrate on the unique design solutions that we came up with. My wife, Allie, has run a blog series discussing the renovation process as it was happening, whereas I will be looking at the details and tools used.

Flooring.

When my wife and I bought this house, we knew it was going to need some work.  The house itself was in great shape - fairly new plumbing, vinyl siding, new A/C unit, and just well cared for in general.  I don’t think either of us really knew how much work some the problem areas were really going to be.  One of the larger projects that we decided to tackle was the flooring.  Originally, the house had beige carpeting throughout.  It was okay – a bit worn down and needed to be replaced.  Truth be told, we could have probably gotten another year out of it.  But, what a pain – I mean we would have had to move all of our stuff out again to put down new carpets, so we decided to do it before we moved it.

Living Room With Original Carpeting
 My wife and I agonized back and forth over what to do.  New carpets?  How about tile?  Wood floors or laminates? Vinyl flooring would look good, at least in the kitchen, maybe?

Tile?
Hardwood?

Vinyl?

Laminate?
 We went to Home Depot, Lowes, and just about every flooring store we could find.  For a while, we hovered around laminate wood flooring as a viable option.  However, there were still questions like: could we install it ourselves, or would we need to hire someone; what would this process cost us?  Our budget was limited, and our time to get this done was even more so. As we began pulling up the carpets in the back bedrooms, we saw the beautiful stained concrete flooring hidden beneath.  We found our flooring, and it was there all along.  Allie and I were so excited – I began pulling up the old carpets and tack strips right away.

As I began pulling up the carpets in the master bedroom, figuring I would work my way out of the house, I remember musing to myself that the process was pretty easy. The carpets were laid over a foam mat cushion, which was secured in place with semi-tacky glue. I removed the tack strips with a pry bar and hammer and simply cut the carpet up into pieces with a standard utility knife.

The Husky 6 in 1 Tool Is One Of Handiest Tools In My Arsenal

Little did I know the house would make me eat my words as I moved into the hallway. Vinyl floors under the carpet. Damn. Fifty year old vinyl floors. Damn damn. 

Vinyl Layer Under Carpet
This was going to take some strategy and a lot of muscle. I started with a heat gun and putty knife, hoping this would do the trick.
If You Go With A Flat Scrapper, Make Sure You Select One With A Thick Blade!

Heat Gun

Nope – not on double layer vinyl, anyway.  Now, it was time for the big guns.  Off to Home Depot to rent an electric scrapper and to purchase adhesive stripper. 


The process was actually far more time consuming that I had thought.  First, you have to pour out the stripper, cover it in plastic, and allow about 15 minutes for the stripper to soak into and under the vinyl.  Then and ONLY then can you begin using the stripper to pull up the vinyl.  While this was labor intensive and slow, it actually went fairly smoothly. We need 4 blades to complete the job, but within a day and half, both the hallway and kitchen were tile free, but NOT adhesive free.  To remove the adhesive, we used more stripping solution, and a combination of manual scrapping tools and the electric unit.

If you attempt this process, make sure you research what kind of adhesive you are dealing with (we had a particularly nasty substance called Mastic) and always use respirators and gloves – the stripper smells nasty and will burn your throat and eyes after prolonged exposure. We used a 3M respirator body with a NIOSH P100 (2097/ Pink Disk) filter and heavy duty rubber gloves.

3M Respirator/ NIOSH P100 Filter

I would also highly recommend using a heavy duty ventilation fan, especially if you have a large space to clear out. 


However, for my small space (about 1,100 sq. ft.), 3 simple box fans from Wal-Mart did the trick (they were about $15.00 a piece).

Lasko Box Fan At Walmart For $15.00
Now, it was on to the living room.  Sure enough, more tile lay under the old carpets.  However, it was a different type of tile – linoleum.  Unlike vinyl, linoleum does not just peel up, it shatters. Allie and I spent hours literally sitting on the floor slamming hand held scrappers into 50 year old linoleum tile.  This was back-breaking work that was not easy to do, but it had to be done – we were past the point of no return. Unfortunately, I do not have “during” photos – but here are the before and after images:

Linoleum Before It Was Removed
Concrete Floor Under Linoleum

Finished Living Room
Stripe Detail
After all of the scrapping and cleaning was completed, we painted border stripes around the edges of the hallway, living room and all of the bedrooms.  We also sealed the kitchen floor with sealant, as the concrete in the kitchen was not sealed, unlike the floors in the other rooms.

I would be interested in hearing from any readers about their floor restoration projects, so feel free to add comments or links to your blogs and sites regarding your do-it-yourself projects. 

Next up: cabinet refinishing.