Monday, April 18, 2011

I'm Back!

Hello all!  After being on vacation for the past week and a half, I have returned to work and I will be posting very soon about my latest projects and my fantastic time in Medford and Portland, Oregon.
44 hours and about 1200 miles of driving - a great time indeed!

Back to work!  NOW!

Monday, March 28, 2011

The Storage Turd 5000

My wife and I have proudly held our heads high when it comes to renovating our home.  We have worked hard on making our floors, walls, bathrooms and kitchen as pretty as we can possibly make them.  We were also very happy with the exterior of our house – it needed some work, but it was still nice and certainly passable.  Then God intervened.  In early October of 2010, the Phoenix Valley was slammed with not one, but two wicked hail storms in the same day and my new neighborhood was right in the middle of it.  After the storm, I, like many of my neighbors filed claims with their respective insurance companies, and work began (and is still going on) all around the community.

Hailstones in our front yard.
One of the larger hailstones.
Our damage bill included the roof, A/C unit, large section of fence, the patio cover and our shed.  TECA Roofing (who I highly recommend) did a fantastic job repairing or replacing everything, except our shed.  Apparently, shed replacement was the one thing that TECA did not do.  But, my wife and I gave it a “whatever”, and concentrated on the big stuff that was being repaired; the shed was damaged, but it was still standing.  As the larger items were nearing completion, Allie and I started shed shopping, along with everyone else in the Valley.  Wonderful.  Just about every place in Phoenix was sold out of sheds, and the few that were remaining were very expensive, so we delayed our purchase for a little while longer.  Finally, we found one well within our price range – things were now in motion.

First, we had to get rid of the existing shed. 
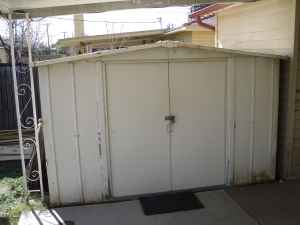
The original shed, the Storage Turd 1000.
Allie and I did not want to deal with the demolition of the old shed so we sold it on Craigslist. The person who bought it also removed it and hauled it away. 

Next step – painting the trim and laundry room of the house.  With the money we saved on the new shed (and with what we made on the old shed), we were able to hire house painters for a little bit of a touch up.  The fact is some of the paint was peeling, so with the old shed gone, the time was just right to paint (the original shed was placed up against the laundry room wall, so with the shed gone, that wall could be accessed).  We hired Richard Dumholf and his crew who did a fantastic job for a very reasonable rate.  In the Phoenix Valley, he can be contacted at 602-525-8904.

The front of our house with the original trim color.
A closeup of the original trim (shown with some storm damage).
The house with our new trim color.
Close up of the new trim color and house numbers.
After two days of painting, the job was completed and the new shed was delivered from Home Depot and it was time to build. 

The shed we bought is a pretty basic Arrow storage shed measuring 10’ wide by 8’ deep with a maximum height of 7’ at the ridge line.  It had a smaller footprint then the original, but at least I could stand up in it (the original only had a height of 6' at the ridge line).  The entire box that it came in was about 7’ long by 3’ wide and only 6 inches thick.  EVERY part was going to have to be assembled.  Tons of panels and what looked like thousands of little screws, bolts and washers of varying shapes and sizes lay inside our cardboard Pandora’s Box.  And, just as with the real thing, once it was opened we couldn’t close it back up.  As a matter of fact, Allie had looked up “Arrow Shed Construction” on YouTube and she found a video of a man describing his experience.  Most notable, he mentioned that he couldn’t PAY anyone to help him, and it took 3 weeks for him to build.  Ugh.  Allie and I had to take a step back, reaffirm our love for each other, and get to work.

Of course, about an hour in, we asked: "why did we do this to ourselves" and "why, God, why"?  Well, we were committed, so no point in whining about it, right?

Step one, the floor kit. This actually wasn’t so bad.  After clearing away the old floor (the buyer of the old shed did not want it) and re-grading the ground, we were able to lay down the aluminum floor supports in a fairly short amount of time.  Then, weather delay.  As we were about to start building the walls, the wind kicked up.  The directions for the shed clearly stated not to build in windy conditions. Unfortunately, we had already started putting up the corners for the walls, so we had to disassemble what we had erected above the floor frame (we left the frame in place) and call it a day.  We picked up construction bright and early on the following Saturday morning and continued into the waning daylight of Sunday evening.

Floor kit assembly with corner wall posts and bracing
(this was after the wind delay).

We started with the walls, again, followed by laying down the plywood deck for the floor.

Walls with exposed floor frame.
Walls with plywood deck.
Close up of deck over frame - I used self tapping screws
to bite into the aluminum framing.
After the deck was down, it was time to finish the walls.  By now, Allie and I were pretty tired, and a little overwhelmed by what lay ahead of us – namely the roof.  But, we pressed on….

Completed walls with floor and roof gables.
The roof was probably the most challenging part of the whole thing, as most of the work had to be done on a ladder while holding large panels and tiny screws.  After fighting with the roof for what felt like forever, we were done with the really hard stuff.  Lastly, we had to add trim and the front doors.  A couple of hours later, and the whole shed was finished.
Inside ceiling support.
Ceiling support toward front door.
We survived.  We didn’t kill each other. There was no ritual suicide involved.  We are not divorced.  The shed did not beat us.   However, at the end of the day, it is just a shed.  It is not pretty or fancy, and it is not the first thing we will be showing out guests who visit.  After all of the large renovation projects that we have done, this one, though laborious and large, just seemed sort of “eh” when all was said and done.  Hence the name, Storage Turd 5000.
The completed Storage Turd 5000. It's not so bad!
Should you decide to attempt to build one of these things, here is some advice:
1. Be patient.  Seriously, this is going to take some time  - Rome was not built in a day, and neither is an  Arrow Storage Shed.
2. Have a helper ready to go - you're gonna need them.
3. Be nice to your helper!
4. Keep your instructions near by at all times and re-read them again and again.
5. Keep track of your parts.  We separated out all of our pieces by number.  This will save you a lot of time and aggravation.
6. We found gloves to be very helpful - the panels are thin and sharp - you could really hurt yourself, so be careful.
7. Think outside the box - the directions are a little vague in some places, as are the diagrams.  There also seemed to be some gaps in the instructions.  So, think ahead and take nothing for granted.  This is only a partial paint-by-numbers project - you will need your brain!

Good Luck!

Tuesday, March 22, 2011

The Zombie Apacolypse (Part 2)

I have returned from my brief hiatus, and as promised, I bring you the ADOT MCV – the zombie apocalypse version!
The ADOT MCV - Civilian Version
The ADOT MCV - Zombie Apocalypse Version
For this version, I decided to show the vehicle all “buttoned up”, that is all of the doors are closed, all of the stairs are folded in, and the outriggers are retracted.

The interior of the vehicle really hasn’t changed, as the ZA edition of the MCV really focuses on beefing up the exterior.  The first and most noticeable addition to the MCV is the giant plow (aka, the “zombie catcher”) mounted on the front of the vehicle. The purpose of this attachment, other then mowing down hordes of the undead, is to push abandoned vehicles out of the way, as well as to punch through the occasional concrete wall.

The Zombie Catcher
The next most noticeable attachment is all of the window guards.  Obviously you don’t want any weak points in your mobile zombie stronghold, and windows are in fact, the number one weak spot.  Therefore, every window and door has been fitted with plate steel, heavy bars or a combination of the two.   

Window and door guards provide extra security.
Rear doors in lock down with rear ramp up.
All of the larger spotlights have also been fitted with protective grills.  The roof is also lined with razor wire for added protection for the gun crew.
Razor wire at the roof line.
Yes, the gun crew.

Gun crew station on the roof.
Their post is located on the roof; built off the roof rack.  There are two gunner stations, one forward left, and the other rear right.  Both stations are semi-protected from the elements with impromptu constructed overhead covers.  The turrets are salvaged from either a military installation or military vehicles (you have to figure that during the zombie apocalypse, military equipment would have been deployed, and possible abandoned as the zombie epidemic spread and overran military bases and checkpoints). The forward section of the roof rack (the narrow portion) can be used to store ammo boxes for the turrets.  

Gun turrets with ammo boxes beyond.
Overhead view.
This was definitely a fun a little project to work on.  Most of the time, as I have stated before, my work is pretty straight forward – a client tells me what they need, and I create it.  Even my promo stuff is usually rooted in architectural design and theory.  This was a fun departure from my usual stuff.  Please, write back, tell me what you think, and feel free to describe (or show) your ideal zombie apocalypse survival vehicle! I hope you enjoyed it!

Thursday, March 17, 2011

A Quick Update....

I have had to put down my blogging pen for the past few days, as work and some other projects have taken up my time.  I will be posting again real soon, starting with the conclusion of the Zombie Apocalypse (Part 2) post, so please stay with me!!!

Tuesday, March 8, 2011

The Zombie Apocalypse (Part 1)

At this point, I think a lot of my readers know that I really enjoy my job and my work.  However, with the economy still in the toilet, work can be hard to come by, and I have to make sure that I am still good at what I do, and I have to find a way to pass the time.  Usually, I do this by creating rooms or buildings – something to show my design and rendering abilities.  However, every now and then, I take a different path by endeavoring in more creative pursuits.  Up until now, my non-architectural creations have been relatively small; Workbench, No. 3 and the Modern Art Gallery featuring several original art concepts.

I also keep myself busy by creating various vehicles such as the Raptor and Rabbit aircraft concepts, along with the “Low Rider” aircraft that will be featured in a later post, but here is a sneak peak:

The Low Riders over New York City
So, during some recent downtime, I decided to design a new vehicle for the zombie apocalypse – strap in folks. First, a congrats to Allie and Sami for correctly guessing the answer to the “Snapshot” posts – yes – the new vehicle is a mobile command center. 

Of course, during the ZA, it’s not like Detroit is going to be pumping out any new custom cars or trucks, so a vehicle is going to have to be salvaged and converted for its new found mission: transporting survivors through the never-ending hordes of the undead.  Before I can convert a vehicle into a zombie killing machine, I first must design a vehicle to be converted, but what to convert? A bus, an RV, how about a large SUV?  Eh, it’s all been done before.  So, I had to create a “civilian” (non ZA vehicle) first; that is, a vehicle that you might see on the road today, and then from that, create the ZA version. 

I drew my inspiration from my father-in-law, Daniel Doyle.  This is a guy that has busted his butt as a highway paving inspector for, among other companies, the Arizona Department of Transportation.  This is not easy work – the pavement can get upwards of 150 degrees at the surface along with 110 degree ambient air temperature.  On top of that, he needs site plans, maps, his cell phone, a 2-way radio, soil and asphalt testing equipment and a myriad of other paper work that he has to have by his side.  Currently, he does all of this from a cab of a stripped down F-150 – what a pain (and clearly inadequate for any kind of zombie killing application).
A standard "no frills" Ford F-150 Pick Up Truck - Dan's current mobile office.

Enter the ADOT Mobile Command Vehicle (MCV).

The ADOT MCV.
This vehicle can hold a 6 person crew, all the maps and charts that he would need, computerized work stations and a tool garage at the rear of the vehicle with ramp access. 

Map and chart room.
Workstations and central light table with overhead monitors.


Rear storage and access ramp.
Rear bay tool shed.
The entire vehicle sits 3 feet off the ground and features a liquid cooled floor as well as a commercial grade HVAC system.  It would be designated as a “wide load” vehicle, meaning that it is 10’-0” wide, allowing for plenty of room to work and move around.  It also features a left and right side drive along with multiple video cameras along the hull to make it easier to drive in tight areas as well as construction zones.  The vehicles oversized tires and chassis height allow it to go just about anywhere, and its massive flood lights allow work to continue at night, when in general, it is cooler to work.

Left and right side driver seats.
Oversized tires provide additional clearance.
An abundance of high powered floodlights provide the ability to work at night.
The MCV also boasts a massive exterior storage rack on the roof with additional tires, a water tank and a compressed air tank.  Toward the front of the vehicle on the roof, there is a collapsible antenna that can link up to the Internet and the ADOT intranet for fast access to changing and updated plans.  The smaller antennas are for local communication between work crews and maintains a streaming real time feed for work progress, including GPS updates to show the exact position of the vehicle and how much road has been paved each day.

Roof rack with collapsible antenna on the left.
Roof rack with water and air tanks on the right.
This is the base vehicle that was created for the ZA – thanks, Dan. 

Next up, the conversion – stay tuned!

PS – there will be more images of this concept posted on my website in the very near future – check it out!  www.lonewolfdrafting.com